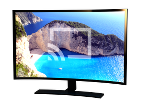
Screen Mirroring
Once your TV is detected and appears in the Available-TVs section, you can just click play button. The green ring around the play button will start blinking and the TV will show a loading indicator. After a few seconds, typically 5-10 secs, the session will start playing on the TV and Play button will turn into stop button.

Mirror Screen to Smart TV display has five sections:
- Status
- Displays
- Available TVs
- Current session
- Profiles
Description of each of them follows...
|  | Status |
The Status section has two lines.
The first line shows the overall application status (Ready to play, No TV, Playing, Transition to play/stop, No network..). When playing, it also indicates the length of the current session.
The second line shows any system events that occur. These events are shown for 2 secs and either disappear or are replaced by another event.
| | Displays |
You can attach up to 3 external displays to certain Mac models (iMac Pro). Mirror Screen on Smart TV allows you to choose which of the active displays shall be cast to the TV. The first display is called main (you allways have at least one..) and the others are numberred II., III. and IV. If you have only one connected display, the II.-IV. symbols are grey and you can't choose them. Once you attach a new display, Screen on Smart TV detects it and updates that section.
You can choose the active display by clicking the button next to the Displays section with a monitor symbol.
You can select the display to be cast only when the app is in Ready to play state, not during an active session.
| | Available TVs |
The app periodically scans your network and searches for newly connected compatible TVs. Once a new one is found, it is added to the list. Similarly, if a TV is being disconnected, it usually notifies cooperating devices and Mirror Screen on TV can thus detect the disconnection (and based on that, it can remove the device from the list).
Mirror Screen on Smart TV has two internal searching modes - until a first TV is discovered, it scans the network in 5-sec intervals. Once the first TV is discovered, scans take place every 15 secs. You can use the re-read button next to the section to re-scan the network anytime.
the app supports up to 100 TVs available on the network. You can choose the active one when the app is in Ready to play state by clicking up or down arrows next to the section.
Names that are shown in the list are customizable in TV settings, i.e. if you want to have a name like "Living room" instead of TV model number, consult with your TV manual on how to change the name.
| | Current session |
Once a session is established, the Current Session section shows you parameters of the session, particularly:
- W: the width of the video;
- H: the height of the video;
- FPS: the number of frames per seconds of the video;
- AUDIO: the status of audio part of the transfer - either OK if the audio driver is installed or info that audio driver is missing - in that case, if you want to cast video with audio, download the audio driver from this page, section Audio Driver;
- ΔT: the time shift between audio and video streams in miliseconds; The shift can be set by clicking plus or minus buttons next to the section;
- HWenc: Application uses hardware H.264 encoder wherever available; if it is available, it shows green text "In use"; there are two other options: first - the Mac is a 2010 or older model and thus it is not equipped with it (red warning: "No HW encoder found") or the encoder is used by another application, typically a video converter or video editting software, e.g. the Final Cut (red warning: "HW enc not available"). In both these cases, the application uses software Apple encoder.
- Bitrate: averaged amount of kilobits per seconds belonging to the session transferred through your Wi-Fi (see UHD doc section for details).
| | Profiles |
There are 12 predefined profiles and 5 user-defined ones. You can choose the one you wish to use by clicking up or down arrows next to the section. You can change the profile only when the Mirror Screen on Smart TV in in Ready to play state, i.e. not during playing. They greatly vary in quality and thus the amount of transferred bites per second over the network (more on them in the doc. section Profiles)
If you have a Macbook, you can find handly the 16:9 button that recalculates Mac screen ratio to TV screen ratio so that there are no black borders in the video stream shown on the TV.
User profiles can be used only when they are defined (they are initially empty).
| | Resource Indicators |
The indicator shows how much is/are CPU(s) of your Mac utilized.
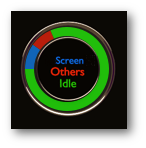
It has three sections:
- Screen: How much resources uses the app itself;
- Others: What is the total utilization of all the other processes, e.g. incl. a video player you use;
- Idle: What are the remaining free resources at your disposal.
The indicator can help you when you define your own profile or when e.g. playing a high-resolution video.
You can try to play e.g. a 4K video in Chrome (YouTube) and send it with the UHD profile to your TV. You will see that the computer is pretty busy.. You can then try to play the same video in Safari and compare the resource utilization.